User code management allows the creation and sharing of user codes using the app or website. The random code generator can be used to create unique user codes, and the Share User Code option allows you to text or email codes in seconds. These features are especially useful when managing large amounts of users on an account and help to create, track, and send user codes effortlessly.
The following instructions will create a randomly generated user code. For more information about creating a specifically designated user code, see Create a system user code.
 .
. and provide a name for the new user, then tap Create.

New system user codes can be created using the app or website.
Important: User codes cannot be edited while the security system is armed. Verify the security system is disarmed before attempting to edit a user code remotely.
The following processes will allow for user codes to be set with a manually entered user code. For more information about creating a randomly generated user code, see Generate and share system user codes.
..Allow a few minutes for new user codes to be active at the panel. If the new user code does not work at the panel or you have additional questions, contact your service provider.
Once created, user codes can be added to or deleted from a door lock using the app or website.
For information about creating users, see Create a system user code.
.. on the desired user.
 to edit user information.
Clips of saved recordings from an Alarm.com Stream Video Recorder can be downloaded locally or uploaded to the Alarm.com cloud using the Customer website. Downloaded clips are in .mp4 format and can be up to 15 minutes long, depending on the SVR/CSVR. Uploaded clips count towards clip upload and storage limits for the account and can be up to 5 minutes long for compatible SVRs and CSVRs.
Note: Saved recordings can also be exported using the local interface of SVRs and CSVRs. For more information, see:
Clips of saved recordings can be exported using the Customer website in a variety of different lengths.
| SVR/CSVR model | Download clip durations | Upload clip durations |
|---|---|---|
ADC-SVR100 ADC-SVR122 ADC-CSVR126 | 30 seconds | Incompatible |
ADC-SVR210 ADC-CSVR2000P/2008P/2016P ADC-CSVR2108P/2116P | 30 seconds | 30 seconds |
 .
.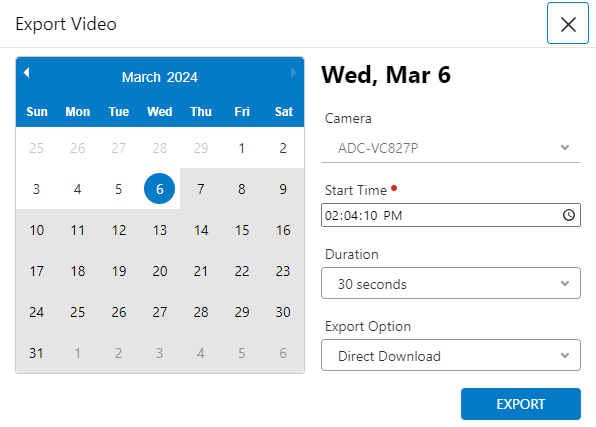
Note: If the request to download the video clip times out, reduce the clip duration and try to download the video again.
Arming the system sets the security sensors to an alarm state. The Armed Away status sets both contact sensors and motion sensors into an alarm state, while Armed Stay status only sets contact sensors to an alarm state.

Note: If the system is not arming properly, check if any unbypassed sensors are open. If the system continues to be unable to arm remotely, contact your service provider.
When arming using the Customer app or Customer website, some of the following options may be available for you to select. Options vary depending on your system's configuration.
 . in the Security card.
Scenes allow you to configure a button on the Customer app and Customer website that triggers multiple actions across multiple devices at once. For more information about Scenes, see How do Scenes work?.
When switching to a different phone for any reason, there are a few things to be aware of to ensure minimal disruption of your service. The following are suggestions for information and features that should be verified when swapping to a different phone.
When swapping to a different phone that was associated with the primary login, the primary phone contact on the account should be updated if the number is different. This ensures that the primary contact is up to date in case the primary contact needs to be reached for any reason.
For more information about how to update the primary phone contact, see Change a phone number.
The rules and notifications on the account should be updated to reflect any phone swaps that are performed. The new phone should be added to the contact recipients for any desired rules and notifications, and the old phone should be removed from any rules or notifications. This ensures minimal disruption in system usage and notifications.
For more information about how to configure notification recipients, see the following articles:
When swapping to a different phone, update the list of Geo-Devices that are attached to the account. In this case, delete the old phone from the Geo-Devices list on the account and add the new phone to the list.
For more information about how to configure Alarm.com Places, see Configure Alarm.com Places.
For more information about how to delete a Geo-Device, see Troubleshooting Alarm.com Places.
When changing phones, the contact information associated with Two Factor Authentication needs to be updated if the feature is enabled for the user's account. To update the contact information that the Two Factor Authentication feature is associated with, disable and then re-enable the feature.
For more information about how to enable and disable Two Factor Authentication, see What is Two Factor Authentication?.